Much more from your bandsaw

Words: Damion Fauser
Photos: Donovan Knowles
The versatility of the bandsaw basically comes down to its anatomy. With most woodworking machines an element of rotational or lateral vectors are applied at the intersection of the blade and the stock. On a tablesaw this can contribute to kickback and it’s also why we need to always mill stock on the jointer from the right to the left.
On a bandsaw the vectors applied at the cut are lineal, and the direction of force applied is downward onto the table, rather than laterally across. This makes the bandsaw a far friendlier machine to use and that’s why I do most of my ripping on it.

1. Setting a zero-clearance base in place.
Damage control
With a downwards cut the teeth exit stock at the base, so this is where any chipping or tear-out will occur. On finer cuts, or to minimise damage, add a zero-clearance base to the saw table. Simply take a small sheet of masonite, set the saw fence to the desired setting and run the masonite partially through at that setting (photo 1). Stop the saw and clamp the masonite in position to give a clean and slick surface and protect against tear-out.
Get the best tooling
Remember it’s not the machine that makes the cut – it merely drives the blade. To get the best performance out of your bandsaw invest in the best tooling you afford. I use BiMetal blades for general cutting and carbide-tipped blades for times where I need to maximise performance and minimise waste.
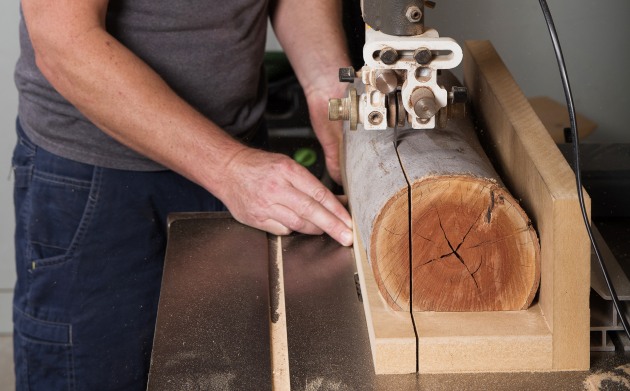
Sawing boards from a log

2. Log-cutting cradle with a log screwed in place.
Knowing how to yield boards from a log or branch can help maximise resources. Here the bandsaw excels, and the average mid-sized 14" or 16" machine will easily handle a log in the order of 1000mm long and up to 150mm thick. For larger logs you need outfeed supports or an assistant.
A jig will help you traverse the round log in a straight line past your blade. A simple right-angle section can work as a cradle with the outside face running against the fence.
The log is fixed to the inside of the cradle with countersunk screws from the outside of the jig, both the vertical side and from underneath to give maximum support. The screws will go into bark and sapwood so the holes will be sawn off. Always be aware of the path of blade when positioning the screws so you don’t damage the blade (photo 2). Set the fence so the blade will skim off the outside edge of the log, to give an initial flat surface.
3. Making the second cut to yield the second flat surface.

4. Once the first two flat faces are cut you can just run the log on your saw without the cradle.
Detach the log, rotate it 90° to now register the flat face into the cradle for better support and then take another pass to yield a second flat surface perpendicular to the first (photo 3). Now you have a piece of wood that can be safely jointed and registered at the table and fence of your saw for sawing boards (photo 4). Store your boards for drying and check their moisture content before use.
Cutting narrow stock into veneers
Making the most of a special piece of wood by resawing it into veneers makes sense. Shop-made resaw fences will allow you to do tall resaws. Use MDF to make simple jigs supported by 45° brackets glued and screwed in place. Take a small chamfer off the bottom of the vertical face of the fence to provide clearance for any errant dust during the cut.

5. Squaring up a shop-made resaw fence.
The resaw fence is clamped in place directly to the table. The distance from the blade determines the thickness of your resawn components. If your saw is already adjusted for drift, use a square to set the fence square to the front edge of the table. Otherwise, determine your drift angle and set the fence using a bevel gauge set to that angle (photo 5).
When determining veneer thickness and the number of pieces don’t forget to take account of the kerf (blade) thickness. I generally saw veneers 2.5–3mm thick and then dress them down to around 2mm.

6. Resawing 2.5mm veneers.
Remember these are ripping cuts, but you are asking the machine and the blade to remove a lot of material, so slow the feed rate down to give the gullets a chance to remove the waste (photo 6). You may need to redress the sawn face so it registers cleanly against the fence for the next pass.
If you plan on arranging your veneers into a decorative pattern, ensure you mark the edge of the stock with a cabinetmakers triangle prior to sawing so that you can always rearrange them into their original orientation when experimenting with your patterns.
Cutting narrow stock into strips

7. Cutting narrow strips.
Narrow strips are useful for edge- bandings, string inlays, splines and more. This is also just a ripping cut, but a very thin one so you might want to use a blade with a finer pitch. Start by using the techniques from resawing veneers to take wide, thin strips. Set a zero-clearance base down on your table at your desired fence setting.
Because the guides may interfere with lowering the post down, either use a supplementary fence made from a piece of plywood, or if your machine allows, rotate the fence extrusion 90° (photo 7). Redressing the reference edge each time ensures at least three dressed faces, meaning strips can be rotated for optimal grain orientation in a project without further work.
Cutting wedges

8. To make a jig for cutting wedges, first mark for a 5° notch.
Wedges are one of the most useful workshop accessories, though I mainly cut small wedges for wedging through tenons. I generally use a 5° angle for my wedges. Draw this in from the edge of a piece of dressed wood and then bring it back up to the edge so the resulting drawn angle is 90° (photo 8). Bandsaw the long section, trim off the short one, then clean up the two cut surfaces with a chisel (photo 9).

9. Using a chisel to clean the saw marks from the bandsawn notch.
Set the fence so the blade runs just along the outside edge of your jig. Run and clamp a zero-clearance base in place to stop the cut wedges from disappearing down the throat plate and getting caught in the lower guides.

10. Push the stock all the way past the blade to prevent the wedge being caught by the blade.
Now take your wedge stock, locate it into your 5° notch and run the pass through to the rear of the blade (photo 10). Your wedge will drop onto the table when you take away the stock and will have a nice clean knife-edge to it (photo 11).

11. Cut wedge showing the knife edge that is possible.

12. Take a wedge off the other corner, then take two more wedges from the other end.
Flip the stock to take a wedge off the other corner at that end and then rotate the stock to take two more wedges from the other end (photo 12). Whilst you have this setup in place, run a quantity of wedges to store for future use.
Cutting tenons

13. Lay out for twin tenons.
The bandsaw excels at this task because the cheek cuts are square and flat. It is easy to set a stop block to stop the cut at the shoulder and if doing twin tenons, it is also easy to use nibbling cuts to remove the waste in between the two tenons.
Lay out your tenons (photo 13) and then set the fence to cut the inside cheek, ensuring you keep the blade in the waste.

14. Set a stop block on the fence to hold the cut at the shoulder.
Mark the shoulder, line it up against the front edge of your teeth and use this to visually set and clamp a stop block on the fence (photo 14).

15. Cutting the outside cheeks.
Run the first outside cheek and rotate the stock 180° and run the opposite cheek (photo 15). Leaving the fence in place, place your stock against the blade as if it was going to cut the inside cheek. Your stock will be offset away from the fence – mill a piece of wood to that thickness and then you can use that to shim your workpiece away from the fence and make the two alternate cheek cuts (photo 16).

16. Using a shim to cut the inside cheeks.

17. Cutting the sub-cheeks.
With this shim technique, you only need the one fence setting to make four cheek cuts, which will save you enormous time. Careful planning will allow you to use this fence setting to also remove the sub-cheeks to form the shoulder all around the tenons (photo 17). To remove the waste in between the two cheeks, push the stock into the blade to take nibbling cuts – the stop block will prevent you from going below the shoulder line.

18. Completed twin-tenons.
For the shoulder cuts use a crosscut sled on the tablesaw or do them by hand as it is important to have clean and crisp shoulders. In photo 18 you’ll see that I’ve just buzzed them off at the bandsaw for the purposes of this article to show the final result.
Trimming splines
Mitre splines are a great way to reinforce and decorate small mitre joinery. Trimming the excess spline material away can be risky and time- consuming, but a bandsaw jig can counter that.

19. Spline trimming jig showing notch to house the blade.

20. Using the spline trimming jig.
Take two pieces of MDF and fix them together with the top layer offset and parallel to the bottom layer. Cut a small notch away from the edge of the top layer – this is where the bandsaw blade will travel during operation. Position the jig so the edge is square to the front of the saw table and the notch houses the sawblade and then clamp it in place. Now you can simply run your project against the edge of your jig and the saw will remove the excess spline material quickly and easily (photos 19, 20).
And dovetails too!
Yes, the bandsaw can even cut dovetails. In my experience, one of the most common causes of poor dovetails is the inability of the woodworker to make repetitive and accurate tail and pin cuts that are square. The bandsaw ensures each and every one of these cuts is perfectly square.
In issue 94, I showed how to make stock that tapers from edge to edge using the planer/thicknesser. Use this technique to machine some stock with an angle suitable for dovetailing (9.46° for 1:6, and 7.13° for 1:8) and then glue a small cleat on the top along the low edge. Layout your pin spacings on the end of your pin boards (highlighted with a marker pen for the photos), register it against the cleat and use this to set the fence to make the cut on one face of the first pin.

21. Tapered pin-cutting jig.
Use a series of shims to progressively space the jig away from the fence to make the first cut on successive pins. Once you’ve made the first cut on the pins, rotate your jig end-for-end and repeat the process to make the second cut on each pin (photo 21).

22. Tail-cutting jig with registration stop for symmetry.
Take a bevel gauge and set it for the angle of your pin-cutting jig. Now take this angle and use it to mark out a tapered long edge on another piece of wood to act as the guide for cutting the tails (photo 22). Glue a small offcut to one end to act as a cleat for registering your tailboards.

23. Bandsawn dovetails, straight off the saw.
Set the fence to make the first cut of the first tail. Because this jig is symmetrical, you can simply flip your tailboard and make the first cut of the opposite tail. Now, use a series of shims to progressively space your jig away from the fence to make the successive cuts. Remove the socket waste as you normally would and, if you’ve been careful in your setups, you’ll have fantastic dovetails straight off the sawblade (photo 23). This technique takes some time and diligence to setup accurately so it’s best kept for a job with a lot of cutting to do.
Template trimming
The bandsaw can be used to remove waste from template components to within a consistently fine distance without risk of cutting below the line, leaving components that are ready to be buzzed off in your templating jig.

24. Starting the cut at the birds-mouth.
You’ll need to make a simple jig that consists of one base platen and a second birds-mouth component fixed perpendicular to the first. The birds-mouth notch is where the sawblade will run and the template runs against the mouth of the birds-mouth (photo 24).
Fix your template to the stock with double-sided tape and start the cut, carefully registering and running the template against the end of the birds-mouth. Careful setup will leave you with the perfectly consistent amount of material to remove at the router table or shaper.
Understanding how the bandsaw works is the key to exploring its versatility. Grab some scraps, make some simple jigs and have a go. I’m sure you’ll enjoy the process and improve your woodworking.
First published in Australian Wood Review, issue 98. This short video shows a few of the techniques above.
Damion Fauser is a furniture designer/maker who lives in Brisbane. He teaches woodwork from his Brisbane workshop, see damionfauser.com.au